Seaside by Example
Seaside is a framework for building web applications in Smalltalk. It was originally developed by Avi Bryant in 2002; once mastered, Seaside makes web applications almost as easy to write as desktop applications.
Two of the better known applications built with Seaside are SqueakSource1 and Dabble DB2. Seaside is unusual in that it is thoroughly object-oriented: there are no XHTML templates, no complicated control flows through web pages, and no encoding of state in URLs. Instead, you just send messages to objects. What a nice idea!
Why do we need Seaside?
Modern web applications try to interact with the user in the same way as desktop applications: they ask the user questions and the user responds, usually by filling in a form or clicking a button. But the web works the other way around: the user’s browser makes a request of the server, and the server responds with a new web page. So web application development frameworks have to cope with a host of problems, chief among them being the management of this “inverted” control flow.
Because of this, many web applications try to forbid the use of the browser’s “back” button due to the difficulty of keeping track of the state of a session. Expressing non-trivial control flows across multiple web pages is often cumbersome, and multiple control flows can be difficult or impossible to express.
Getting started
The easiest way to get started is to download the “Seaside One-Click Experience” from the Seaside web site3. This is a prepackaged version of Seaside 2.8 for Mac OSX, Linux and Windows. The same web site lists many pointers to additional resources, including documentation and tutorials. Be warned, however, that Seaside has evolved considerably over the years, and not all available material refers to the latest version of Seaside.
Seaside includes a web server; you can turn the server on, telling it to listen on port 8080, by evaluating WAKom startOn: 8080, and you can turn it off again by evaluating WAKom stop. In the default installation, the default administrator login is admin and the default password is seaside. To change them, evaluate: WADispatcherEditor initialize. This will prompt you for a new name and password.
<ttp://seaside.st>
Start the Seaside server and direct a web browser to http://localhost:8080/ seaside/ .
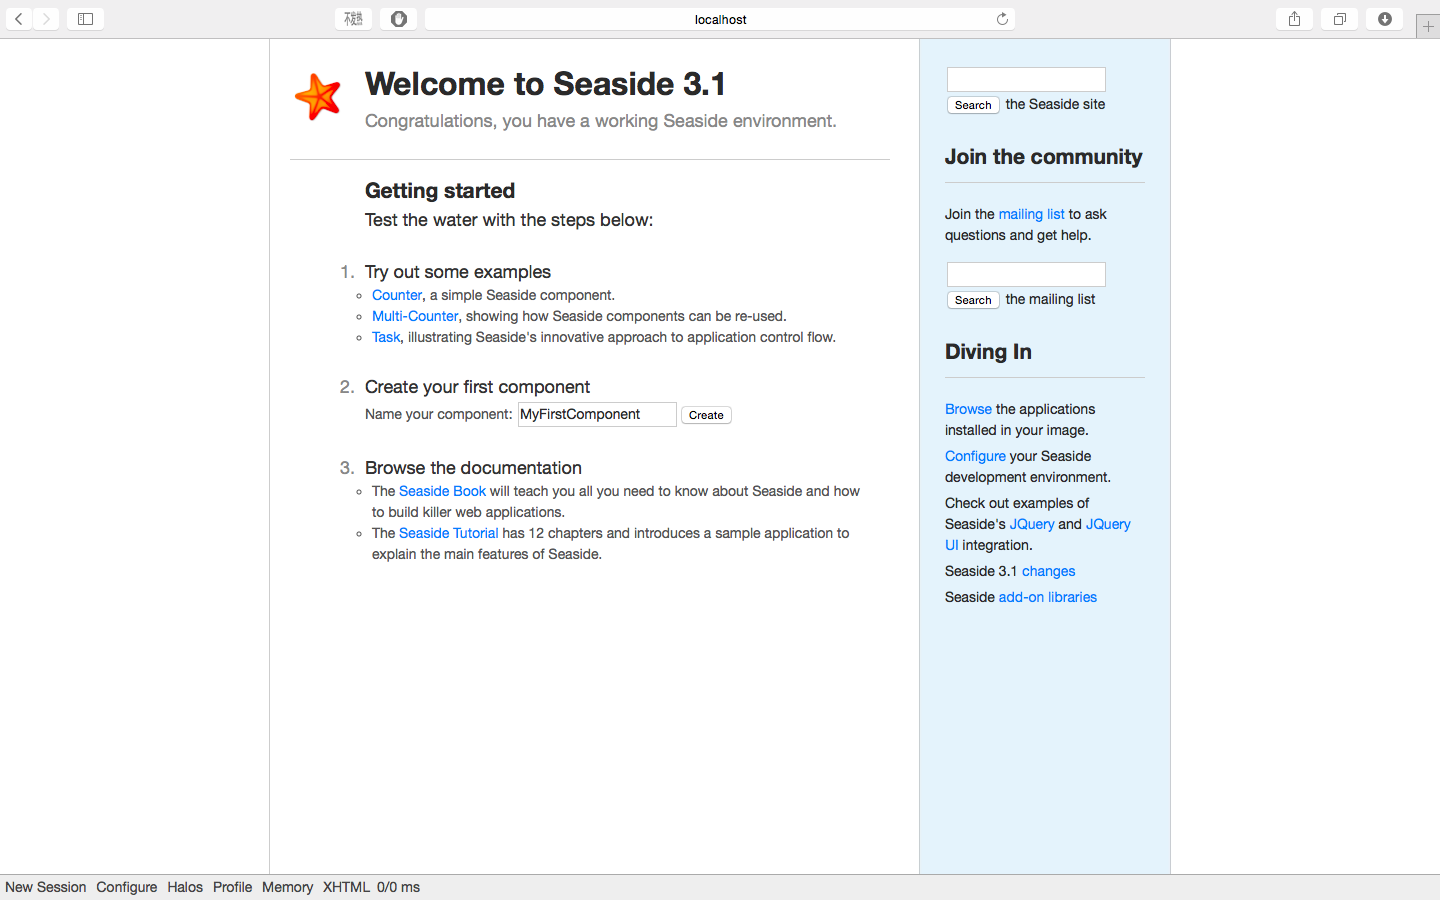
Starting up Seaside
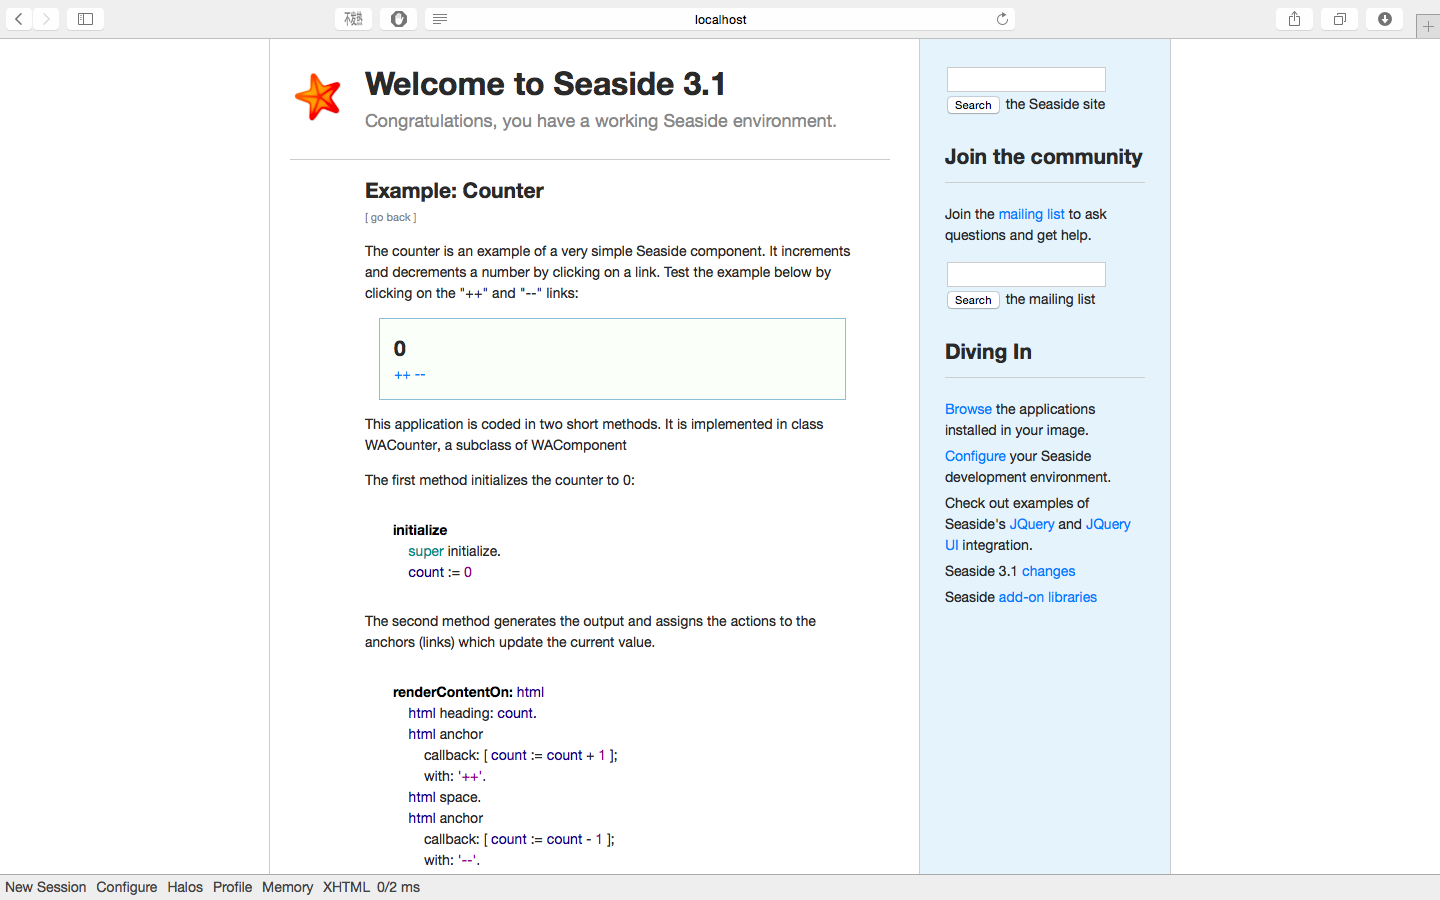
The counter.
Seaside components
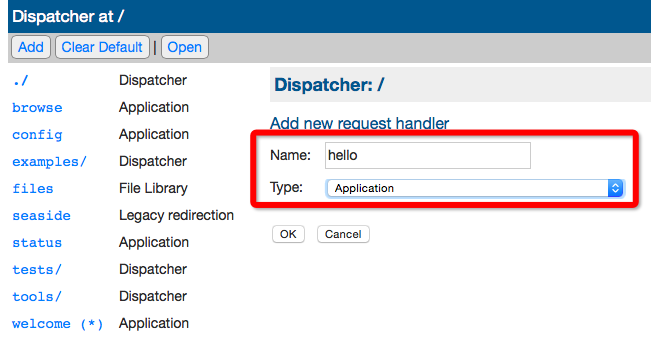
Configuring a new application
Define a subclass of WAComponent called WAHelloWorld.
WAComponent subclass: #WAHelloWorld
    instanceVariableNames: ''
    classVariableNames: ''
    poolDictionaries: ''
    category: 'Seaside-Component'
Implement the following method, and put it in a protocol called rendering:
WAHelloWorld >>
renderContentOn: html
    html text: 'hello world'
Implement the following method on the class side of WAHelloWorld.
WAHelloWorld class >>
canBeRoot
    ^ true
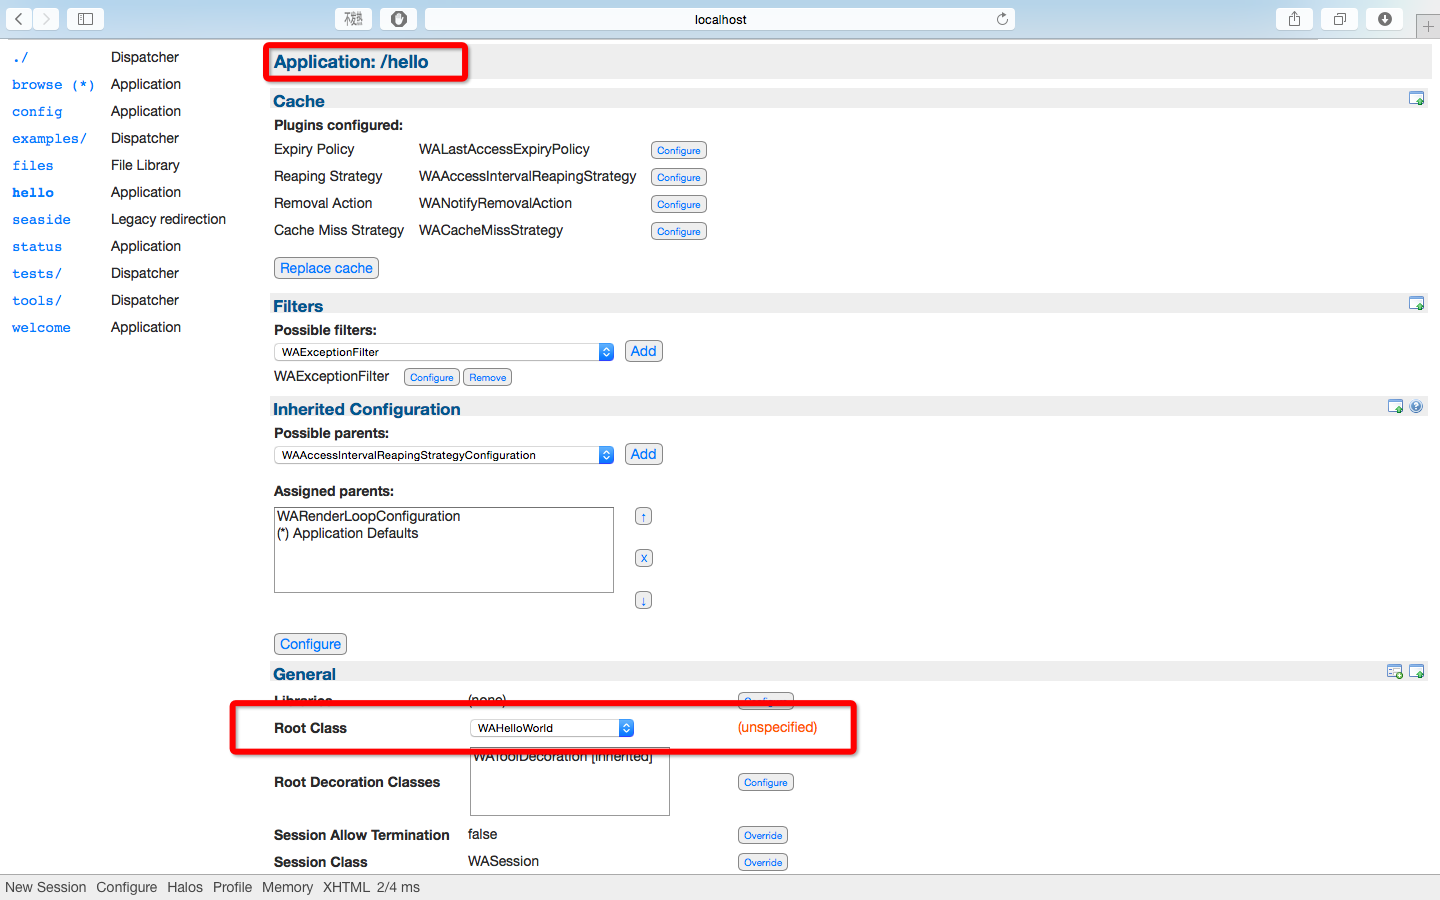

“Hello World” in Seaside
State backtracking and the “Counter” Application
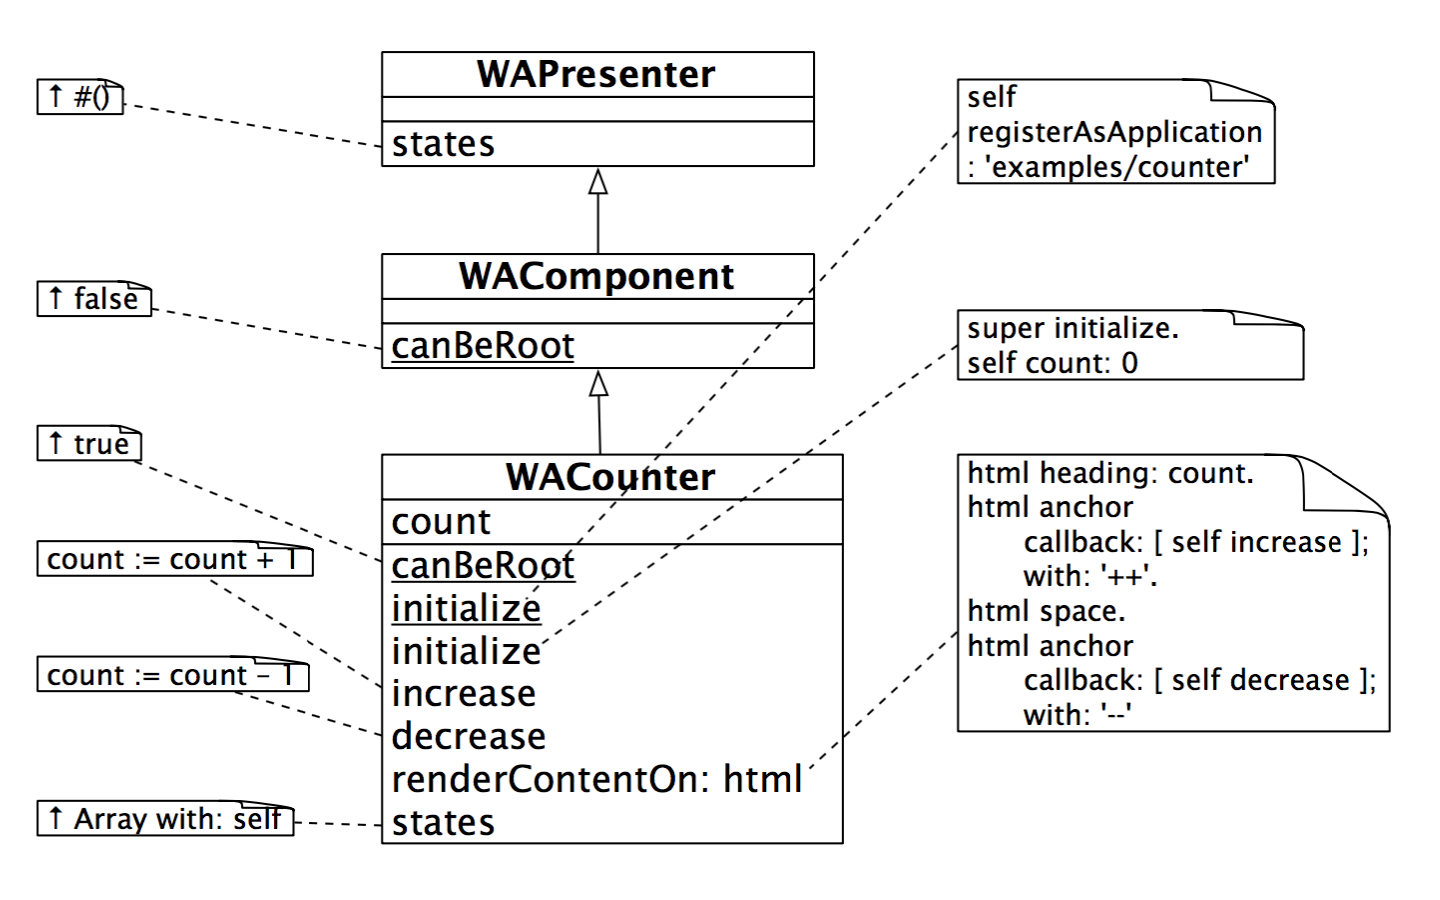
The WACounter class, which implements the counter application. Methods with underlined names are on the class-side; those with plain-text names are on the instance side.
Rendering XHTML
Rendering the Counter
The rendering of the counter is relatively straightforward; the code is shown in Figure 12.8. The current value of the counter is displayed as an XHTML heading, and the increment and decrement operations are implemented as html anchors (that is, links) with callbacks to blocks that will send increase and decrease to the counter object.
We will have a closer look at the rendering protocol in a moment. But before we do, let’s have a quick look at the multi-counter.
From Counter to MultiCounter
WAMultiCounter, shown in Figure 12.9 is also a standalone application, so it overrides canBeRoot to answer true. In addition, it is a composite component, so Seaside requires it to declare its children by implementing a method children that answers an array of all the components it contains. It renders itself by rendering each of its subcomponents, separated by a horizontal rule. Aside from instance and class-side initialization methods, there is nothing else to the multi-counter!
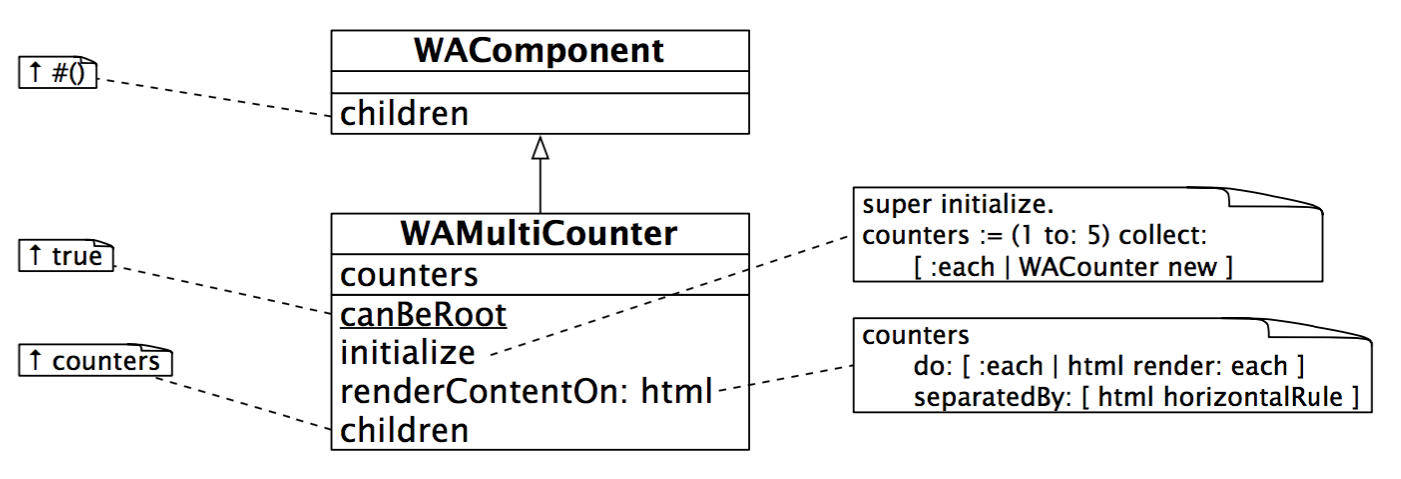
WAMultiCounter
More about Rendering XHTML
Here are some of the most basic rendering methods:
html text: 'hello world'.  "render a plain text string"
html html: '–'.  "render an XHTML incantation"
html render: 1.  "render any object"
Using Brushes
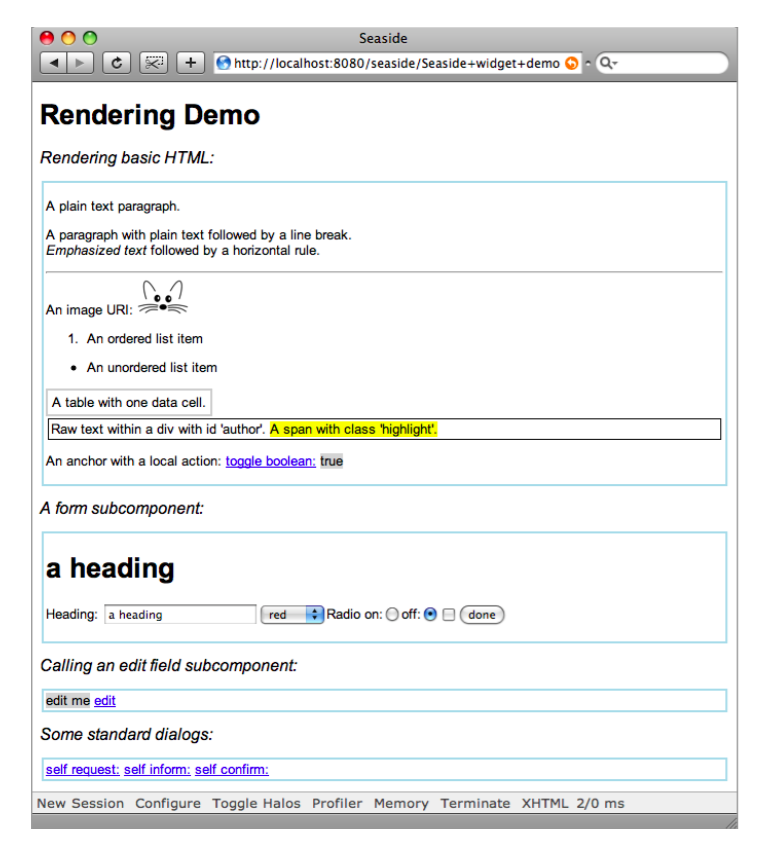
RenderingDemo
If you send a cascade of messages to a brush including the message with:, then with: should be the final message. with: both sets the content and renders the result.
Note that actions should appear only in callbacks. The code executed while rendering should not change the state of the application!
Forms
Since a form is a complex entity, it is rendered using a block. Note that all the state changes happen in the callbacks, not as part of the rendering.
CSS: Cascading style sheets
Cascading Style Sheets, or CSS for short, have emerged as a standard way for web applications to separate style from content. Seaside relies on CSS to avoid cluttering your rendering code with layout considerations.
SeasideDemoWidget >>
style
    ^ '
body {
    font: 10pt Arial, Helvetica, sans−serif, Times New Roman;
}
h2 {
    font−size: 12pt; font−weight: normal; font−style: italic;
}
table { border−collapse: collapse; } td {
    border: 2px solid #CCCCCC;
    padding: 4px; }
#author {
    border: 1px solid black; padding: 2px;
    margin: 2px;
}
.subcomponent {
    border: 2px solid lightblue; padding: 2px;
    margin: 2px;
}
.highlight { background−color: yellow; } .boolean { background−color: lightgrey; } .field { background−color: lightgrey; }
'
SeasideDemoWidget common style sheet.
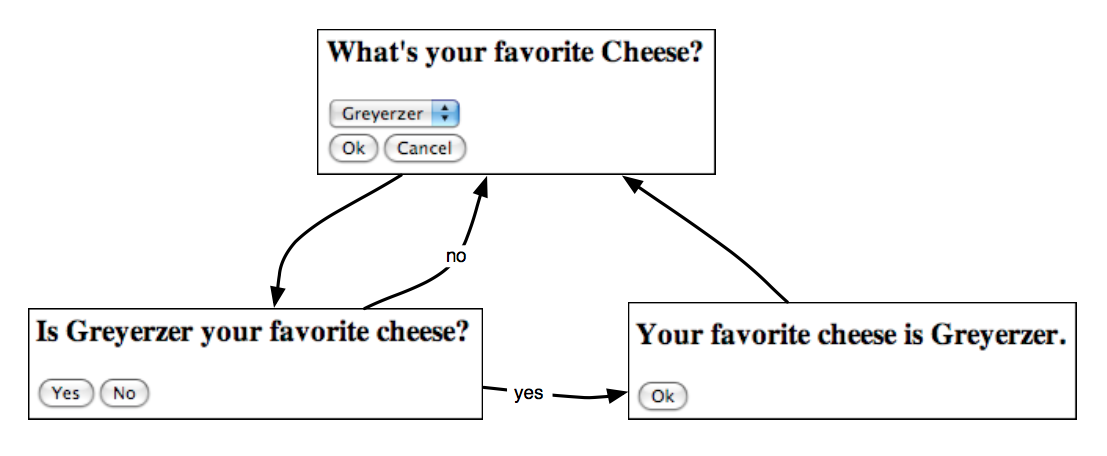
Managing control flow
Seaside makes it particularly easy to design web applications with non-trivial control flow. There are basically two mechanisms that you can use:
- A component can call another component by sending caller call: callee. The caller is temporarily replaced by the callee, until the callee returns control by sending answer:. The caller is usually self, but could also be any other currently visible component.
- A workflow can be be defined as a task. This is a special kind of component that subclasses WATask (instead of WAComponent). Instead of defining renderContentOn:, it defines no content of its own, but rather defines a go method that sends a series of call: messages to activate various subcomponents in turn.
Call and answer
call: and answer: should never be used while rendering. They may safely be sent from within a callback, or from within the go method of a task.
Convenience methods
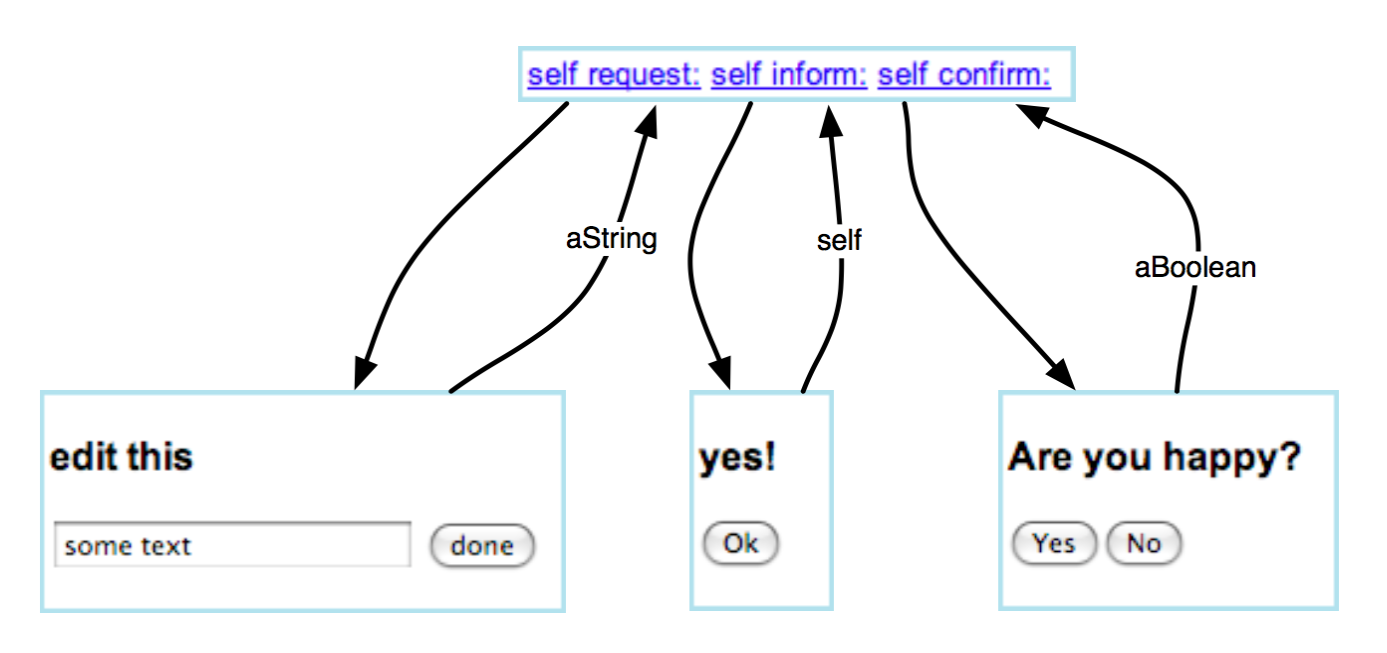
Some standard dialogs
Tasks
A task is a component that subclasses WATask. It does not render anything itself, but simply calls other components in a control flow defined by implementing the method go.
A simple task
Transactions
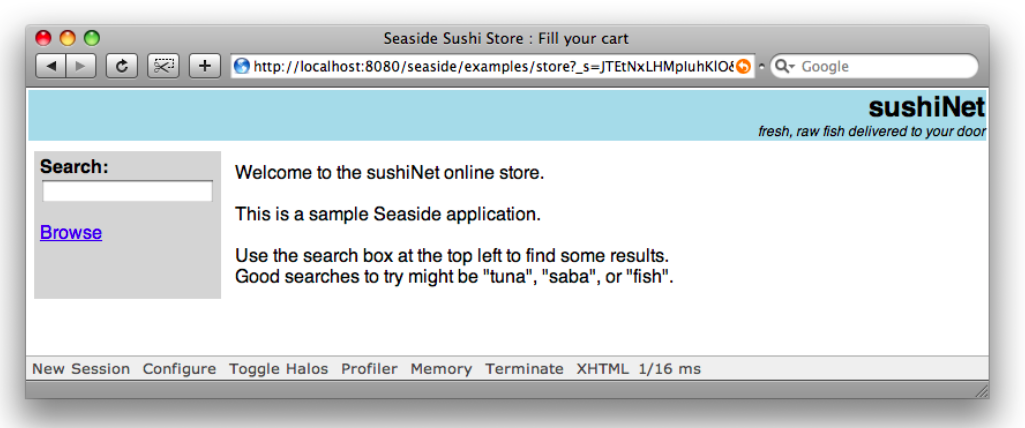
The Sushi Store
The sushi store supports the following workflow:
- Visit the store.
- Browse or search for sushi.
- Add sushi to your shopping cart. 4. Checkout.
- Verify your order.
- Enter shipping address.
- Verify shipping address.
- Enter payment information.
- Your fish is on its way!
A complete tutorial example
Let’s see how we can build a complete Seaside application from scratch.8 We will build a RPN (Reverse Polish Notation) calculator as a Seaside application that uses a simple stack machine as its underlying model. Furthermore, the Seaside interface will let us toggle between two displays — one which just shows us the current value on top of the stack, and the other which shows us the complete state of the stack. The calculator with the two display options is shown in Figure 12.15.

RPN calculator and its stack machine
We begin by implementing the stack machine and its tests.
Define a new class called MyStackMachine with an instance variable contents initialized to a new OrderedCollection.
The exercise should take at most a couple of hours. If you prefer to just look at the completed source code, you can grab it from the SqueakSource project http://www.squeaksource.com/ PharoByExample. The package to load is PBE-SeasideRPN. The tutorial that follows uses slightly different class names so that you can compare your implementation with ours.
We will make use of 5 classes:
- MyRPNWidget—this should be an abstract class that defines the common CSS style sheet for the application, and other common behavior for the components of the RPN calculator. It is a subclass of WAComponent and the direct superclass of the following four classes.
- MyCalculator — this is the root component. It should register the application (on the class side), it should instantiate and render its subcomponents, and it should register any state for backtracking.
- MyKeypad — this displays the keys that we use to interact with the calculator.
- MyDisplay — this component displays the top of the stack and provides a button to call another component to display the detailed view.
- MyDisplayStack — this component shows the detailed view of the stack and provides a button to answer back. It is a subclass of MyDisplay.
A quick look at AJAX
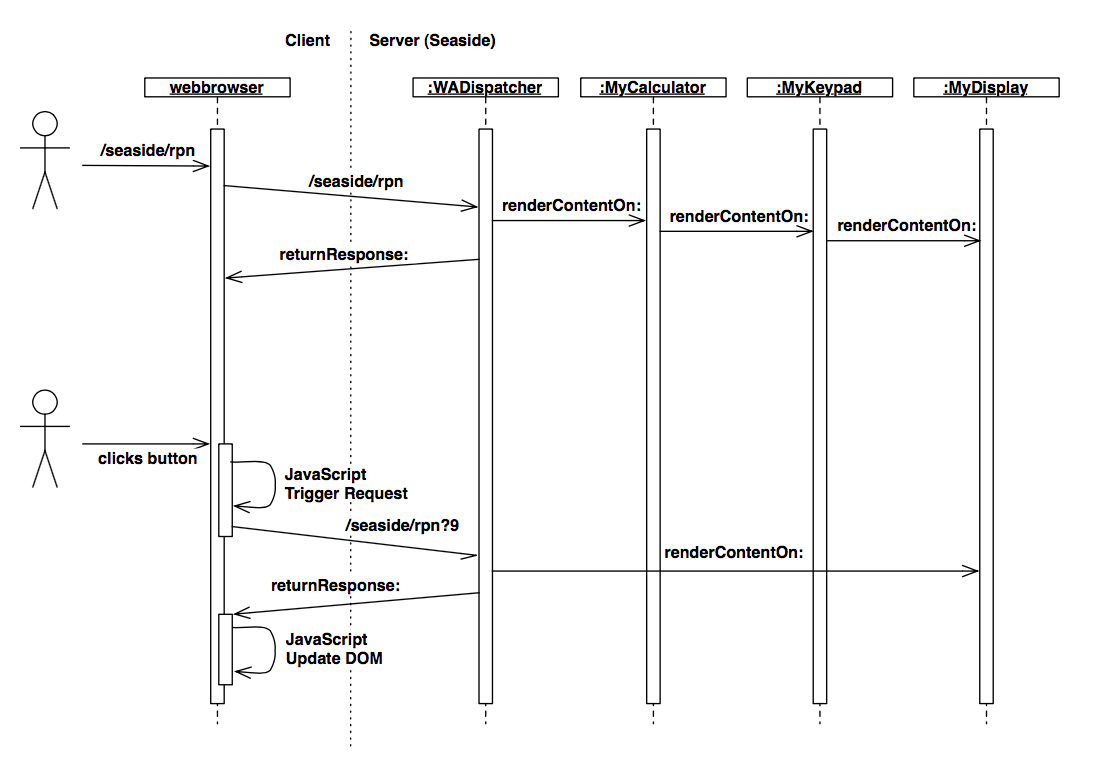
Seaside AJAX processing (simplified)
Chapter summary
- The easiest way to get started is to download the “Seaside One-Click Experience” from http://seaside.st
- TurntheserveronandoffbyevaluatingWAKomstartOn:8080andWAKom stop.
- Reset the administrator login and password by evaluating WADispatcherEditor initialize.
- Toggle Halos to directly view application source code, run-time objects, CSS and XHTML.
- Send WAGlobalConfiguration setDeploymentMode to hide the toolbar.
- Seaside web applications are composed of components, each of which is an instance of a subclass of WAComponent.
- Only a root component may be registered as a component. It should implement canBeRoot on the class side. Alternatively it may register itself as an application in its class-side initialize method by sending self registerAsApplication: application path. If you override description it is possible to return a descriptive application name that will be displayed in the configuration editor.
- To backtrack state, a component must implement the states method to answer an array of objects whose state will be restored if the user clicks the browser’s “back” button.
- A component renders itself by implementing renderContentOn:. The argument to this method is an XHTML rendering canvas (usually called html).
- A component can render a subcomponent by sending self render: subcomponent.
- XHTML is generated programmatically by sending messages to brushes. A brush is obtained by sending a message, such as paragraph or div, to the html canvas.
- If you send a cascade of messages to a brush that includes the message with:, then with: should be the last message sent. Thw with: message sets the contents and renders the result.
- Actions should appear only in callbacks. You should not change the state of the application while you are rendering it.
- You can bind various form widgets and anchors to instance variables with accessors by sending the message on: instance variable of: object to the brush.
- You can define the CSS for a component hierarchy by defining the method style, which should return a string containing the style sheet. (For deployed applications, it is more usual to refer to a style sheet located at a static URL.)
- Control flows can be programmed by sending x call: y, in which case component x will be replaced by y until y answers by sending answer: with a result in a callback. The receiver of call: is usually self, but may in general be any visible component.
- Acontrolflowcanalsobespecifiedasatask—ainstanceofasubclassof WATask. It should implement the method go, which should call: a series of components in a workflow.
- Use WAComponents’s convenience methods request:, inform:, confirm: and chooseFrom:caption: for basic interactions.
- To prevent the user from using the browser’s “back” button to access a previous execution state of the web application, you can declare portions of the workflow to be a transaction by enclosing them in an isolate: block.