Displaying a Refresh Control for Table Views
Problem
You want to display a nice refresh UI control on top of your table views that allows your users to intuitively pull down the table view in order to update its contents. Examples of a refresh control in two of its different states are shown in Figure 4-25.
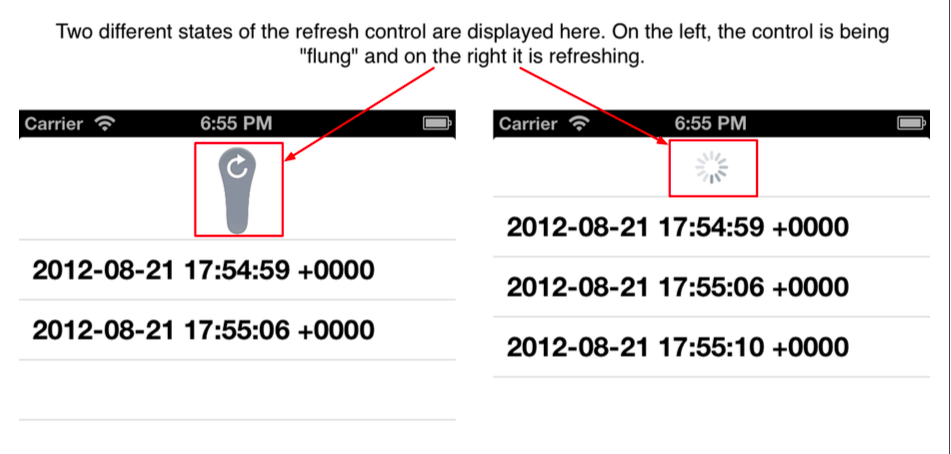
Figure 4-25. Two different states of the refresh control
Solution
Simply create a table view controller and set its refresh Control property to a new instance of UIRefreshControl class, as shown here:
- (void) viewDidLoad {
	[super viewDidLoad];

	/* Create the refresh control */
	self.refreshControl = [[UIRefreshControl alloc] init];
	[self.refreshControl addTarget:self
		action:@selector(handleRefresh:)
		forControlEvents:UIControlEventValueChanged];
}
Refresh controls are a new UI component added to the iOS 6 SDK. They are simple visual indicators that appear on top of table views and tell the user that something is about to get updated. For instance, prior to iOS 6, in order to refresh your mailbox in the Mail app, you had to press a refresh button. In iOS 6, now you can simply drag the list of your emails down, as if you wanted to see what’s above there in the list that you haven’t read already. Once iOS detects this gesture of yours, it will trigger a refresh. Isn’t that cool? Twitter’s iPhone app started this whole thing when they added a refresh control to their apps, so kudos to them for this. Apple has realized this is in fact a really nice and intuitive way of updating table views and has since added a dedicated component to the SDK to implement it. The class name for this component is UIRefresh Control.
Create a new instance of this class simply by calling its init method. Once you are done, add this instance to your table view controller, as described in the Solution section of this recipe.
Now you’ll want to know when the user has triggered a refresh on your table view. To do this, simply call the addTarget:action:forControlEvents: instance method of your refresh control and pass the target object and a selector on that object that takes care of the refresh for you. Pass UIControlEventValueChanged to the forControlEvents parameter of this method.
Here—I want to demonstrate this to you. In this example, we will have a table view controller that displays date and time formatted as strings. Once the user refreshes the list by pulling it down, we will add the current date and time again to the list and refresh our table view. This way, every time the user pulls the list down, it triggers a refresh that will allow us to add the current date and time to the list and refresh the table view to display the new date and time. So let’s start in the implementation file of our table view controller and define our refresh control and our data source:
#import "ViewController.h"

@interface ViewController ()
@property (nonatomic, strong) NSMutableArray *times;
@end
The times property is a simple mutable array that will contain all the instances of NSDate in it as the user refreshes the table view. We have already seen the initialization of our table view controller in the Solution section of this recipe, so I won’t write it again here. But as you saw there, we have hooked the UIControlEventValueChanged event of our refresh control to a method called handleRefresh:. In this method, all we are going to do is add the current date and time to our array of date and times and then refresh the table view:
- (void) handleRefresh:(id)paramSender {
	/* Put a bit of delay between when the refresh control is released and when we actually do the refreshing to make the UI look a bit smoother than just doing the update without the animation */
	int64_t delayInSeconds = 1.0f;
	dispatch_time_t popTime = dispatch_time(DISPATCH_TIME_NOW, delayInSeconds * NSEC_PER_SEC);
	dispatch_after(popTime, dispatch_get_main_queue(), ^(void) {
		/* Add the current date to the list of dates that we have so that when the table view is refreshed, a new item will appear on the screen so that the user will see the difference between the before and the after of the refresh */
		[self.times addObject:[NSDate date]];

		[self.refreshControl endRefreshing];
		[self.tableView reloadData];
	});
}
Last but not least, we will provide the date to our table view through the table view’s delegate and data source methods:
- (void) viewDidLoad {
	[super viewDidLoad];

	self.times = [NSMutableArray arrayWithObject:[NSDate date]];

	/* Create the refresh control */
	self.refreshControl = [[UIRefreshControl alloc] init];
	[self.refreshControl addTarget:self
		action:@selector(handleRefresh:)
		forControlEvents:UIControlEventValueChanged];
}

- (NSInteger)numberOfSectionsInTableView:(UITableView *)tableView {
	return 1;
}

- (NSInteger)tableView:(UITableView *)tableView numberOfRowsInSection:(NSInteger)section {
	return self.times.count;
}

- (UITableViewCell *)tableView:(UITableView *)tableView cellForRowAtIndexPath:(NSIndexPath *)indexPath {
	static NSString *CellIdentifier = @"Cell";
	UITableViewCell *cell = [tableView dequeueReusableCellWithIdentifier:CellIdentifier];

	if (cell == nil) {
		cell = [[UITableViewCell alloc] initWithStyle:UITableViewCellStyleDefault reuseIdentifier:CellIdentifier];
	}

	cell.textLabel.text = [NSString stringWithFormat:@"%@",
	self.times[indexPath.row]];

	return cell;
}
Give this a go in either the simulator or the device. Once you open the app, at first you will see only one date/time added to the list. Keep dragging the table view down to get more items in the list (see Figure 4-26).
Figure 4-26. Our table view controller is populated by a new item every time it is refreshed