问题
你希望能够在 UI 组建中直接能够显示富文本,而不是针对每一种格式创建一个单独的 UI组建。例如,你想要在一个 UILabel 中显示一个句子,该句子中只有一个单词是粗体。
方案
构建一个 NSAttributedString 实例对象,或者可修改的 NSMutableAttributedString。可以 通过设置 UI 组建(如 UILabel)具体的某个字符串属性,或简单的使用字符串属性内置方 法来在 canvas 上绘制 text。
讨论
富文本是很好的东西!许多程序员需要在 UI 组建中的一行文本内显示各种样式的字符 串。例如,在文本中的一行之内,你可能需要同时显示竖直的和斜体字,即一个单词是斜 体,剩余的是正规文本。或者你希望一句话中的某个单词具有下划线。要实现这样的功能,我们中的有些程序员需要使用 Web View,但是这没有优化的方案,因为 Web View 渲染内容 非常的慢,这就影响了程序的执行效率。而现在,在 iOS 6 中,我们可以使用属性字符串 了。不知道为什么到现在苹果才将这个功能实现到 iOS 中,而在 Mac 开发中,很早以前就 可以使用属性字符串了。
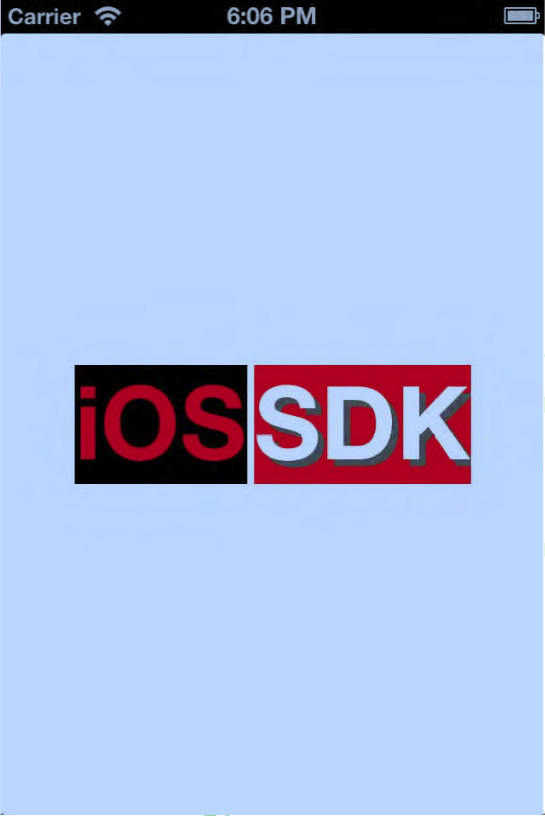
在开始之前,我先用图 2-93 所示向你展示一下什么是属性字符串。然后我将通过编 程来实现这样的效果。

图 29-3 显示在 label 中的一个属性字符串
注意:为了更好的介绍,这里的文本是渲染在 UILabel 实例对象中的。
OK,从上图中,我们看到什么呢?如下所列: 具有如下属性的“iOS”:
- 60points 大小的粗体
- 背景色为黑色
- 前景色为红色
具有如下属性的“SDK”:
- 60points 大小的粗体
- 白色的文本
- 亮灰色的阴影
构造属性字符串的最好方法就是使用 NSMutableAttributedString 类的 initWithString:方 法,同时传递一个 NSString 到这个方法中。这将会创建一个没有任何属性的属性字符串。 然后,通过 NSMutableAttributedString 类的 setAttributes:range:方法来给字符串中的不同部分 设置属性。这个方法有两个参数:
setAttributes
是一个字典,字典左右的 key 都是字符属性,每个 key 的值依赖于 key 本身。下面 是字典中可以设置的一些重要 key:
NSFontAttributeName
这个 key 的值是 UIFont 的一个实例,用来定义指定字符串范围的字体。
NSForegroundColorAttributeName
这个 key 的值是 UIColor 类型,用来定义指定字符串范围的颜色。
NSBackgroundColorAttributeName
这个 key 的值是 UIColor 类型,用来定义指定字符串范围的背景颜色。
NSShadowAttributeName
这个 key 的值必须是 NSShadow 的一个实例,用来定义指定字符串范围的阴影。
range
是 NSRange 类型,用来指定属性应用在字符串的起点和长度。
注意:要想查看上面这个方法可以传递的所有不同 key,可以浏览苹果在线文档关于 NSMutableAttributedstring 类介绍。由于相关的 URL 苹果可能会随时改变,我就不把 URL 直接放在这里了,不过很容易搜索到。
在下面的例子中我将实例分为两个属性字典。“iOS”属性字典可以通过下面的代码来 构造:
NSDictionary *attributesForFirstWord = @{
    NSFontAttributeName : [UIFont boldSystemFontOfSize:60.0f],
    NSForegroundColorAttributeName : [UIColor redColor],
    NSBackgroundColorAttributeName : [UIColor blackColor]
};
而“SDK”则使用下面的属性:
NSShadow shadow = [[NSShadow alloc] init];
shadow.shadowColor = [UIColor darkGrayColor];
shadow.shadowOffset = CGSizeMake(4.0f, 4.0f);
NSDictionary attributesForSecondWord = @{ NSFontAttributeName : [UIFont boldSystemFontOfSize:60.0f],
    NSForegroundColorAttributeName : [UIColor whiteColor],
    NSBackgroundColorAttributeName : [UIColor redColor],
    NSShadowAttributeName : shadow
};
然后将它们放在一起。通过下面的代码,不仅创建了 label,还设置好了文本属性:
#import "ViewController.h"
@interface ViewController ()
@property (nonatomic, strong) UILabel *label; @end
@implementation ViewController - (NSAttributedString ) attributedText{ NSString string = @"iOS SDK"; NSMutableAttributedString result = [[NSMutableAttributedString alloc] initWithString:string]; NSDictionary attributesForFirstWord = @{ NSFontAttributeName : [UIFont boldSystemFontOfSize:60.0f], NSForegroundColorAttributeName : [UIColor redColor], NSBackgroundColorAttributeName : [UIColor blackColor] }; NSShadow shadow = [[NSShadow alloc] init]; shadow.shadowColor = [UIColor darkGrayColor];  shadow.shadowOffset = CGSizeMake(4.0f, 4.0f); NSDictionary attributesForSecondWord = @{ NSFontAttributeName : [UIFont boldSystemFontOfSize:60.0f], NSForegroundColorAttributeName : [UIColor whiteColor], NSBackgroundColorAttributeName : [UIColor redColor], NSShadowAttributeName : shadow }; / Find the string "iOS" in the whole string and sets its attribute / [result setAttributes:attributesForFirstWord range:[string rangeOfString:@"iOS"]]; / Do the same thing for the string "SDK" / [result setAttributes:attributesForSecondWord range:[string rangeOfString:@"SDK"]]; return [[NSAttributedString alloc] initWithAttributedString:result]; }
- (void)viewDidLoad { [super viewDidLoad]; self.view.backgroundColor = [UIColor whiteColor]; self.label = [[UILabel alloc] init]; self.label.backgroundColor = [UIColor clearColor]; self.label.attributedText = [self attributedText]; [self.label sizeToFit]; self.label.center = self.view.center; [self.view addSubview:self.label]; }